Testing Unity projects with GameDriver
Ok, so we've talked about the state of the industry and why games need test automation. We talked about open betas, and the risk they impose to your game development project. We talked about game monetization and how it is key to the long term success of a game. But we haven't shown exactly how GameDriver can help you to reduce development and testing costs, reduce time to market and most of all, improve the quality of your game - which we believe is the most critical factor for a title's success.
That's what we're going to show you here.
Designed to be familiar, GameDriver is structured to be used similarly to any Unit Test framework. GameDriver's unique capabilities extend that by allowing the tester to interact with the game world just as either a real player or a developer would. That means you can choose to test the game in the Unity Editor, or as a standalone build. You can control movement, keyboard and mouse input, and even directly control object states such as location. GameDriver's API allows you to query object states as well, giving you complete visibility into what's happening in the game during your automated tests.
How it works is simple. During game development, we embed an object in the game that acts as the agent to the API calls, and can control the game. This would typically happen very early, in an initial loading or splash scene, to allow control from the very beginning so that the agent can remain in memory and available after the scene is unloaded. Manual testing can still be supported by enabling or disabling input control via an API call.
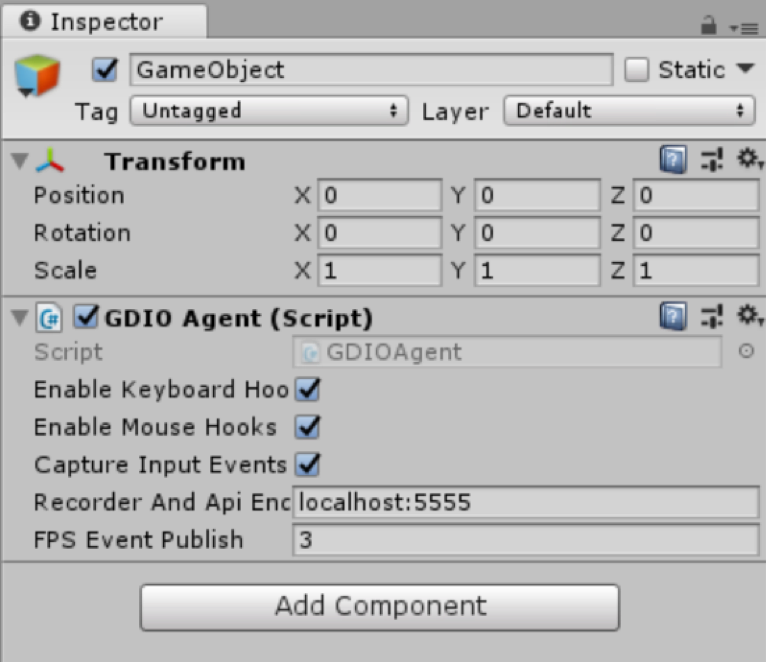
Now that the agent object is part of the game, we can write and execute tests in Visual Studio and execute them against either the Unity IDE or built game.
Tests are written using the standard NUnit template, and follow the same structure and execution flow. A reference to the GameDriver library - gdio.unity_api.dll - is all that's needed to provide access to GameDriver's API and functionality: start and stop play mode, execute the standalone game, or several methods for sending keyboard or mouse input, and player movements.
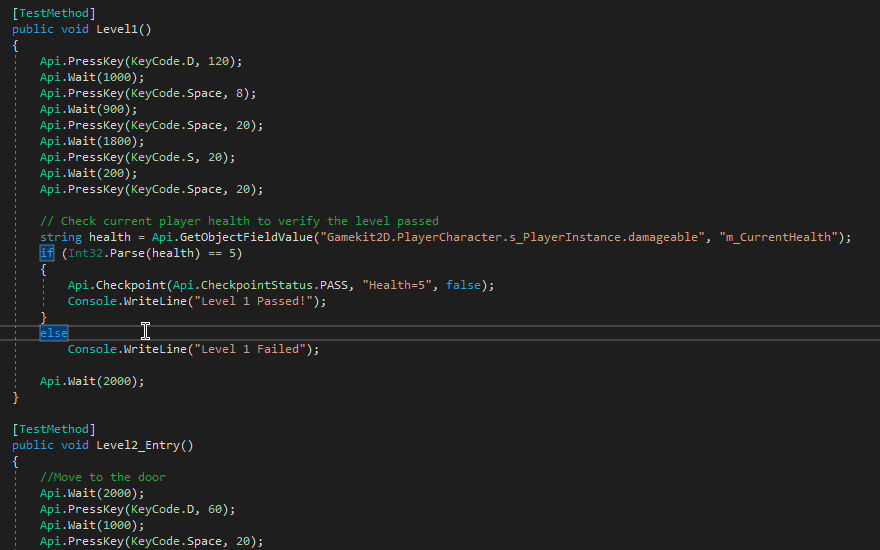
We have also included utilities that can be used to capture the current running FPS of the game, capture screenshots, and set checkpoints to provide pass/fail feedback. You can control or querying the state of objects in the game, and even change the timescale used for execution to run the game faster or slower than normal, depending on your test objective.
Once you have the basics figured out, it's time to do some testing. Initial tests should be the kinds of repetitive tasks that a manual tester would perform with each and every build. For example:
-
Start the game
-
Create a new character with different options
-
Complete the tutorial - broken up as needed
-
Use different controls and game options
By automating these repetitive tasks, testers will be free to focus on new or changed features after every build. This saves time, and will reduce the amount of manual testing required as the game is developed or released.
Secondly, you will want to plan your automation strategy. In order to avoid repetition and control the cost of maintenance as the test automation library grows, it can be beneficial to break up your tests into discrete activities. This is often referred to as a modular testing framework, and is a familiar concept to developers. A good example might be the login portion of your game.
Instead of coding the login to your game into every script, you would simply create a Login function and include all of the user actions needed to launch and login to your game. Then, subsequent tests that require the login portion to run would simply call this function rather than implementing it. This means less coding for each test, and significantly less maintenance effort if the login portion of the game were to change.
Lastly, a best practice in test automation is to execute your tests after every build of the game. This is referred to as regression testing, and automation will give your developers immediate feedback as to whether the build broke any existing features in the game. Whether you are building your game internally or using cloud services, this approach can be used simply by adding test jobs to your build project. This is a familiar step for Developers who are already running unit tests for every build, and a subject we will cover in more detail later.
By running these tests automatically, you will save time in each and every build. This also helps to improve game quality by catching regression issues as they are introduced, rather than later when the dev team has already shifted focus.
GameDriver gives you complete control over the game, allowing you to build a comprehensive automated regression test suite that will save time, increase test coverage by allowing your manual testers to focus on new or changing features, and most of all improve the overall quality of your project.
Contact us today to give it a try!